Here's my sweet Shane modeling one of my swirly scarves that I just recently made.
When I was waiting at the doctor's office a couple of weeks ago, a lady in the waiting room was making the cutest swirly scarf. I cozied up next to her and proceeded to find out how she was making them. After I started making the scarves the way the waiting room lady showed me, my friend Beverly R. showed me and even easier and faster way to make the same scarf. So that's what I'm going to try and show you how to do. I've had so many people ask me to show them how to make the swirly scarves and I thought this would be the best way to do it . . . so everyone can learn how to do it.
You can get the yarn at Walmart for under $5! It looks something like this:
I always roll my yarn up into a ball before I start my crochet projects. I kinda went overboard and bought yarn in every color!
I used a crochet hook in the size I or size J. It's just what I happened to have on hand. :)
The yarn looks like this when you get it:
You need to stretch it out to reveal all the loops within it. The top loops are the ones you'll be using to crochet the scarf. The pretty crocheted part by my thumb is the bottom edge.
To start the scarf, double back under about 3 or 4 inches of the unraveled yarn. When you crochet, you will be incorporating the underneath along with the top layer of yarn to begin the scarf and hide the end of the yarn. (The picture shows it doubled back on top, but I turned it over before starting.)
Stick the crochet hook inside the first loop on the end, including both layers of the doubled-back yarn.
Then count over 4 loops from where you started . . .
Insert the crochet hook into the 4th loop over from the starting place.
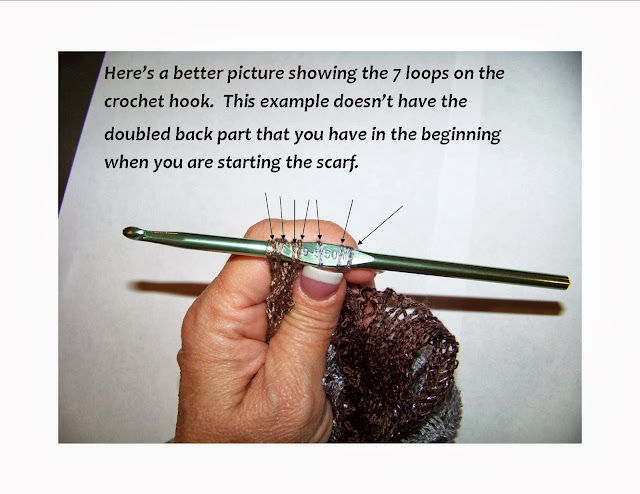
That's the first stitch! Now continue doing the same thing until you have a swirly scarf the length you want! Just continue unraveling the yarn and counting over 4 loop spaces . . . insert your hook in the 4th loop and continue until you have 7 loops on your hook . . . then pull the 7th loop through the first 6 loops on your hook . . . then do it again!
And like this from a different angle . . .
When I get the scarf to the length I want, then I just pull the last stitch through and tie a knot in it and then cut the rest of the yarn off.
Here's what it looks like when you are through with it.
So pretty! And a very quick and easy project you can complete in the Comfort of your Home!
I've quickly and easily made 4 of the scarves, and I'm planning to make some more for the school Christmas bazaar!
Just a little something to bring comfort to you in your home from
the Ferrell boys and me!
**********************************************
Check out my other posts from my 31 Day Writing Challenge in October on the topic of "Comfort and Home" HERE.
I'm linking up to these super fun parties:


These scarves are so pretty! I've never learned to sew or crochet or knit and seeing things like this make me regret it!
ReplyDeleteOooh... Thank you for the tutorial! Your way is definitely easier than what I was taught! -Marci @ Stone Cottage Adventures
ReplyDeleteCant wait to make a few of these! I featured this today over at the Inspiration Monday party.
ReplyDelete~Jamie
How do you tie a knot in the scarf?
ReplyDeleteI love them. Thanks for sharing your tutorial.
ReplyDelete