Pages

Thursday, March 20, 2014

Pirate Party Invitations - - You Aaargh Invited!


If you take the time to search the internet and pinterest, you can find lots of free birthday invitations for just about any birthday party theme.

I found some very cute and free invitations for a Pirate Party on my search of the internet, but when I saw the message in a bottle invitation, I knew that's what I wanted to do for Shane's party.

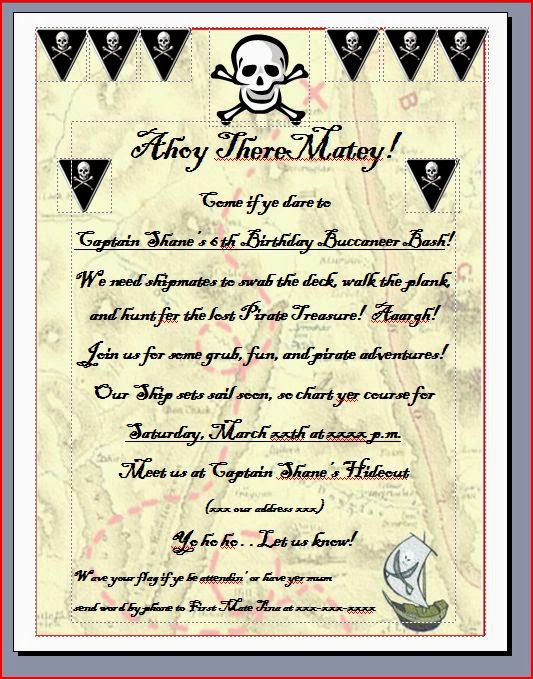
I used my Microsoft Publisher program to make the invitations.  I found a faded out treasure map to use as the background of the invitations.  I also found several invitations on the internet using fun Pirate language in the invite and picked through the ones I found until I came up with a Pirate invitation that I liked.

I used the Blackadder ITC font for the invitations.  It really looks like a Pirate script.  I added some skull and bones clip art.   Here's what it looked like before I printed it.


I printed out the invitations on plain white copy paper.  I ripped the sides of the paper to give the invitation a rough, jagged edging.

I used a black ink pad from my scrapbooking supplies to darken the edges of the invitation and make it look aged.


I could have burned the edges with matches, but I thought using the black ink would be safer for me.  


I used a pencil as a guide for rolling the invitations up into slender tubes and tied them with jute twine.


Most of the message in a bottle invitations use glass bottles, but I didn't want to use glass bottles with 6 year olds.  I've been saving my plastic water bottles for this purpose.


Shane helped me put together his invitations.  First we used a funnel to put some sand in the bottles. . . certainly real messages in bottles have some sand in them . . .


It required some serious concentration.


Besides the sand, we also added some slivers of pirate gold a/k/a glitter to the bottles.


We figured a hint of gold would entice our friends to the party. 


Then we added the invitation to the bottle.


Aaargh Matey!  


Shane had a great time putting these invitations together for his friends.  My only suggestion - Make sure the sand is completely dry otherwise the invitations will be damp and the ink will fade where it gets wet.  Don't ask me how I know this.  :)  


The next step involved a little oven action.  Shane and I gathered up some of his broken and unloved crayons.  We peeled the paper off and put them in a silicone baking dish.


We set the oven for 200 degrees and let the crayons melt slowly in the oven.


We dipped the tops of the bottles into the melted crayon . . .


Then we used an initial embossing stamp to put the letter "F" in the melted crayon.  I had help from Captain America in completing this step.  :)


The tops turned out really cute.  Blue for boys . . .


Pink for girls . . .


I made some labels using Microsoft Publisher to put on the outside of the bottles . . . 


and some skull tags to tie around the tops along with a little burlap flourish.  :)


The end result of all of mine and Shane's hard work made me happy.


And although the invitations cost me a lot of time, they didn't cost me any money to make.  


I used all materials that I already had on hand . . . and I got to spend some quality time with my favorite pirate of all.

The invitations are done so now I'm committed to the party.  I just hope that once the party is over, I won't have to be committed!  

So much to do before the big day!  And lots of pirate adventures are still waiting for . . .

                           the Ferrell boys and me!


I'll be linking up to some awesome Blogging Parties!  
Check out Serenity Now:  Weekend Bloggy Reading for more great ideas!


Wednesday, March 19, 2014

Skull and Bones Wreath - Part 2


The best part about having a Pirate themed birthday party is how easy it's going to be finding decorations to set a pirate mood.

I have about 4 or 5 containers of Halloween decorations in my storage shed with lots of skulls and crossbones to use for the pirate decorations.

The first item I retrieved from the storage shed was the skull and crossbones wreath I made for last year's Halloween door hanger.


You can read about how I made this wreath in my earlier post Skull and Bones Wreath.  

I wanted to make the wreath a little more like a pirate wreath so I found a pirate hat printable on the internet to print and also added a patch to cover one of the eye sockets.


I thought a Pirate greeting was also necessary to "warn" our party guests before entering the "hideout".  :)

I took a piece of cardboard and quickly painted a Pirate greeting that seemed fitting for a Ferrell boy pirate party.


When I was finished and showed it to Shane a/k/a the birthday boy, his whole face lit up.  He thought it was awesome!  What do you think?


Step by step . . . I'm checking off the items on my to-do list for Shane's pirate birthday party.

Next on the list . . . birthday invitations . . . and I have a great idea for those!

Until then . . . more pirate adventures await . . . 

                             the Ferrell boys and me!

Monday, March 17, 2014

Pirate Party Loot Bags

Shane's 6th birthday is coming up at the end of March, and the boys and I decided on a pirate theme for his party.  Aaargh!

I've been busy posting ideas on my PirateParty Pinterest board . . . everything and anything pirate.  


The main agenda of any good pirate is acquiring pirate "booty" or as defined in the dictionary:  pirate treasure, plunder or other ill-gotten gains.  :)

So I decided to make some little black bags for the children to accumulate their "booty" in during the party.  ( I love saying booty . . . I don't know why! )  I had some black material in my material stash that I used to make the bags.  I simply folded over some of the material, cut it the width and height I wanted each bag, and stitched up the sides to make the bags.


I may or may not finish off the top of the bags.  In some ways I think leaving the top edges rough adds to the pirate effect.  I'll probably use my pinking shears to finish the edges.

Next I wanted to stamp a skull and crossbones on the front of the pirate bags.  I decided to make a stamp using a potato.  I didn't have a small circular cookie cutter so I used a apple-shaped cutter from this Pampered Chef set.


I sliced the potato in half.  I used the apple-shaped cutter and pushed it into the surface of the cut potato until it was pushed in about 1/4 inch into the potato.  Then I used a small knife and cut around the potato using the metal of the cutter as a gauge of how deep to cut.  Below is the potato with the cutter pushed into the potato with the cut-away part laying beside it.


Once I removed the cutter from the potato, you can see the apple cut-out on the potato surface.


I then used the knife to cut away the apple design carefully to make a skull shape.


I used a paper towel to dry the cut potato stamp, and then I dipped it into some white acrylic paint.


Then I stamped the skull impression onto the lower part of the black booty bags.


I used the other potato half to cut away some of the potato to make the cross bones image to stamp under the skull.


It wasn't as easy to free-hand that design and I was worried about how it was going to look.  It looked okay once I stamped the bags with it.


I ended up just painting the crossbones by hand instead of using the stamp.  It looked just a good as the stamped image and seemed to be quicker.


I made a gazillion of these pirate booty bags.  I got a little carried away.  I had all the materials I used to make the pirate booty bags on hand so I didn't have to go out and buy anything . . . which is always a good thing.  


I made these very quickly on Saturday.  It took about 30 minutes to sew up the bags and stamp them . . . which was a good thing cause I wasn't feeling too spiffy this weekend.  Sinus crud has invaded my head.  :/

But I couldn't let the weekend get by without doing something productive toward Shane's birthday party.  

After all it's only a couple of weeks away, and I've got lots I want to do to make sure it's saturated with plenty of pirate adventures for Shane's friends and also for . . .

                            the Ferrell boys and me!

I'll be linking up to some awesome blog parties!  Check out Serenity Now:  Weekend Bloggy Reading for some great ideas.


Thursday, February 20, 2014

Zach's Birthday Party

I haven't been blogging lately.  No reason other than I just haven't been in the mood to blog.

We've had the flu.  We've had the terrible cough.

I switched my medicine and went through a period of adjustment that included being in a bad mood for two weeks.  :/

Now everyone is doing better.  Even me.  :)

January 3rd was Zach's birthday.  


We had a sleep over with a few of his friends from church.


Luckily they were quite able to entertain themselves because I was all alone and in charge -- Dave had to work that night!


The boys were all so great that night.  Easy to deal with . . . but LOUD!  They played video games and played outside.  Even though its was really cold outside, those crazy boys played hide and seek in the dark!  In and out the doors they went . . . over and over again.  :)

Zach doesn't like birthday cake so we had ice cream sundaes instead.


Basically all you need are lots of food and ear plugs to have a successful party with loud, rambunctious 11 year old boys.


Oh and hot chocolate for the cold!  I don't know what's going on with Alex's hair!


After breakfast the next morning . . . egg 'n the hole is always a winner for these boys!  


I also made cinnamon rolls, but they didn't last long enough for me to take a picture!

The boys continued to play outside  . . .  by exploring the pasture and hay bales and riding atvs.


I tried to organize the boys' belongings before their parents arrived to pick them up!  Ha! 


It was a great party!  Zach and his friends had a great time together.  One of the boys said it was the best party ever.  :)

Hopefully I will get back in the blogging mood.  I know many of you enjoy reading about the many adventures and mishaps of . . .

                  the Ferrell boys and me!


Wednesday, January 8, 2014

Wednesday Word: De-clutter

It's a new year.  A time for new beginnings.  A time for cleaning out . . .  to organize . . .  to de-clutter.


It's been on my mind too.  My sweet momma has come out to the farm to help me go through the boys' rooms, closets, and toy bins. She loves to do that kind of stuff.  Really.  She does.


But so much of my house . . . way more than just their rooms . . . gets cluttered up and messed up with our every day three little boys' life. . . book bags . . . shoes . . coats . . . in the closet floor.


Video games . . . dvds . . . board games . . . on the bookshelves.

I'm really not much better with my stuff either. 

I have so much stuff too.  Really.  And I don't know why or what the reason is for all this stuff either.  My  momma has decided that the master bedroom is her next project.  :/

I haven't been too eager for her to come out and get started on mine and Dave's bedroom.  I really don't want to hear her comments regarding all my clothes (that I can't wear) and craft stuff (I won't ever use) and sewing stuff (that's been a work in progress for years).  

And then my devotion this morning . . .


Matthew 6:19-34

New International Version (NIV)

Treasures in Heaven

19 “Do not store up for yourselves treasures on earth, where moths and vermin destroy, and where thieves break in and steal. 20 But store up for yourselves treasures in heaven, where moths and vermin do not destroy, and where thieves do not break in and steal. 21 For where your treasure is, there your heart will be also.  {source}

Wow!  God really convicted me today with these words.  Am I storing up treasures in my walk-in closet and in my drawers and with the knick-knacks sitting around my house?

Moths and vermin and thieves . . . Yuck!  

Am I storing up treasures in heaven?  Or are my treasures being stored up here on earth?  For where your treasure is . . . there your heart will be also.

Is my heart really committed to my treasures in heaven or is my heart committed to the things of this earth sitting in my closet and packed away in my rubbermaid containers?  

And soooooo today's word is de-clutter.  I'm going to de-clutter my life of all these excess and useless items and clothes and objects that are not treasures to me and my family.  I'm going to clear up my surroundings of all this clutter and focus on storing up treasures in heaven.  :)  And without all this clutter in and about me, I'll be able to focus on my true treasure . . . where my heart truly is . . . with my God and with heavenly treasures.

So join me and my momma this new year as we de-clutter away at Ferrell Farm with . . . 

                                 the Ferrell boys and me!


Wednesday, January 1, 2014

The 2013 Year in Review


I made this video on Slidely to highlight some of the fun times we shared during this past year.  Hope you enjoy it!


The Ferrell Boys and Me in 2013 by Slidely Slideshow

Happy New Year from . . .

                               the Ferrell boys and me!


Christmas Craft: Nativity Stocking Holders


I saw these awesome Nativity Stocking Holders on U Create blog last year and ordered the vinyl cut-outs immediately.


But I never got around to making them last year (2012).

I bought some stocking holders during after-Christmas sales last year for 75% off . . .


 and put them back for this Christmas.  Here's what I did:

First I removed the snowman and santa from the glittered base by removing the screws.


I sanded the glitter off and spray painted them white.


I found a 2x6 board out in the barn and got my sweet Daddy to cut it for me to accommodate the vinyl cut-outs.


Painted them all white and after they were completely dry, I lightly sanded them.


I laid out the vinyl cut-outs and carefully applied them to the painted wood.


Carefully peeled the paper off to reveal the sticky part of the vinyl.


Carefully place the sticker on the wood.  Carefully.


And slowly and carefully I applied the vinyl cut-outs to each block of wood.  (I don't know why the seasoning salt is sitting out there.)


At this point, I gathered up all my materials and headed to my Daddy's workshop.  DIY crafting is much more fun with Daddy!  :)

Daddy helped me attach the wooden blocks to the metal base. 


Me and the drill aren't always friendly with each other.  :)


After attaching the metal bases, I sprayed the finished stocking holder with a clear coat acrylic spray.  


I love them! 


Of course, they totally blocked the TV!  That's something I'll have to fix before next year!  


The boys kept moving them to see the TV so I never hung their stockings.  I had actually planned to make some burlap stockings for the boys and replace the Santa stockings that I've used for the past few years, but I didn't get to it.  So that's a project for next Christmas.

You can order the vinyl cut-outs too.  Go to the Ucreate blog and contact Becky. She quit taking orders before December 1st, but will probably sell them again in 2014.  If you go down the comments, you can find her email address and contact her about purchasing them.  I think I paid around $10 for the set.

I know Christmas is past and the new year has begun, but I never finished posting everything we did this Christmas season, so I'll be sharing more of the Christmas adventures and activities of . . .

                            the Ferrell boys and me!