Pages

Saturday, March 31, 2012

Resurrection Gardening at the Farm

I had to work in Circuit Court during spring break so I didn't get to have any fun with my boys the week they were off.

We didn't go anywhere or do anything special -- at all. 

Now that Shane's birthday party is behind me, I'm all about getting ready for Easter and making up some of that missed Spring Break Fun with my boys.  I usually have the house decorated for Easter several weeks before the big day, but this year I decided to wait until after Shane's party.

So with Easter being one week away . . . the Ferrell boys and I started preparing for Easter by making Resurrection Gardens.  I saw a post about a Resurrection Garden on WeAreThatFamily blog and loved it!  It didn't look complicated and most of the items to make it are readily available at the farm.

I didn't have any clay trays to put our gardens in, but I had some plastic trays that the boys and I had painted for some reason or other . . .


I spray-painted the trays with some brown spray paint I had leftover from a past project involving a volcano . . .


I didn't want to spend any money on these Easter gardens so I tried to make do with items we have around the farm.  We have plenty of dirt . . .


Even though I didn't want to spend any money on this project, I did stop by the Dollar Tree and get 3 little clay pots ($1) and a bag of rocks ($1).


I was going to use some small cups for the tomb and rocks out of our driveway, but the 3 little clay pots for $1 is pretty reasonable, I think! 


And the rocks in our driveway are dirty and yucky. . . the bag of rocks I bought are shiny and pretty!  They made me happy.


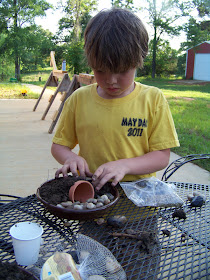
To make the resurrection gardens, you lay the small clay pot on its side in the middle of the tray.  Then you pile dirt around the back and sides of the clay pot and on top of the clay pot . . .  covering the pot . . . making it look like a cave . . .


Be sure and put your pot in the tray before adding the dirt . . .  Someone wasn't following my directions exactly . . .


After mounding the dirt over and around the clay pot, you place the rocks in front of the opening of the clay pot . . .


Then you sprinkle grass seeds over the dirt.  We had some grass seed left over from last year that we used . . . I hope it still grows!


In the instructions for the Resurrection Garden, she says nothing about covering the seed up with dirt, but Zach and Shane covered their seeds up.  Alex left his exposed on top of the dirt.   


They put a lot of grass seeds on the dirt -- a Lot!  I wonder how much they should have put!?!  Look at Alex's garden!  It's covered in seeds!


After sprinkling the seeds on the dirt, we made crosses out of sticks.  I hot-glued the sticks together, and the boys placed the 3 crosses on the mounds of dirt -- behind the tomb.


We looked in the driveway and found 3 big rocks to "roll" in front of the tomb.


I had to help Shane finish his garden.  When I went inside to hot-glue the crosses together, he started loading the back of his dump truck with the leftover dirt . . . and that was the end of his interest in making the gardens!

Zach and Alex really enjoyed making the Gardens.  They asked if we could do this every year.  We watered the dirt and seeds and placed the Gardens on the front porch so it would get the morning sun.

Alex's, Zach's, and Shane's Resurrection Gardens
 I think this is an awesome project for Easter!  I can't wait to see the grass sprout on the hill and cover the tomb.


 Afterwards I cleaned up the mess we made on the patio by blowing off the dirt and then washing off the dirt that wouldn't blow off . . . Did I mention about Shane filling up his dump truck with dirt . . .and then dumping dirt all over the patio in several places . . .

Dave was somewhere else this evening, so it was just me and the boys for supper tonight.   I thought it would be fun to let the boys make their own pizza. 


This is not the type of activity that goes over too well when Dave is home.


Dave stresses out about the boys making a big mess -- especially about Shane making a mess! 


Me . . . I don't worry about the mess too much!  Ha!  Look at that sweet face!


 The pizzas turned out yummy and the boys had a great time making them.  I got the little pizza crusts and pizza sauce at the Dollar Tree today.  You gotta love that!

This morning Shane and I went to my Weight Watchers meeting to weigh in.  Dave and the other two boys stayed at home, but I thought it would be fun to take Shane with me for a change.

I weighed in and had lost 2 pounds! Yea!  That's 21 total pounds!  Woo Hoo!  They also let Shane weigh in.  :)  He got a sticker too.  They are so great at the Saturday WW meeting.  I really enjoy the group of ladies that work there on Saturday.

At the Dollar Tree, Shane was so cute.  I pushed a buggy around the store, and he carried one of the little baskets.  He was constantly putting things in his basket that he wanted to get.  I told him he could have 1 thing.  Ha!  He just ignored me and kept piling stuff in his basket!

When it was full, he turned to me and said, "I'm ready to go Mom.  I need to get this stuff scanned."  Ha!  And then he left me and headed for the check out line . . . broke in ahead of everyone . . . stood on his tippy toes to put the whole entire basket on the counter . . . and said, "It needs to be scanned."  Ha!  The check out lady was nice about it all.  Of course, she gave me a LOOK when I asked her to put the basket behind the counter cause he was only getting 1 thing out of it!  Ha!

We're starting the Easter story tomorrow . . . on Palm Sunday . . . with the Teaching Eggs!  I can't wait to share the story of the Resurrection with my boys! 

I hope you are looking forward to Holy Week . . . and more Easter Fun with

                       the Ferrell boys and me!

I'm linking up to


Thursday, March 29, 2012

I'm Making Plans for Holy Week -- Are You?

I love Easter!  It is my favorite holiday -- more than Christmas or even Thanksgiving!  And I love Thanksgiving!

Tomorrow I'm going to bring out my Easter decorations and start getting ready for the upcoming Holy Week.

I've been following some of the leads I've collected on my Pinterest Easter Ideas board.  I'm leaning more to the Easter Resurrection activities this year than what I have traditionally done with my boys.

For instance, we always make containers of Easter grass.  It is such a fun activity for the boys.  What's not to love?  Seeds, dirt, and water . . . Perfect ingredients for little boy fun, right?  My boys have loved planting the seeds in the pots of dirt and watering the pots every day . . . waiting for the seeds of grass to sprout.  Once the grass has grown, we would put Easter eggs in the pots of grass and use it for centerpieces on the tables.

This year I'm going to do a variation to that activity. . . one that helps to visually tell the story of Jesus' resurrection.

We are going to make a Resurrection Garden.  I pinned this picture:


from the blog, We Are That Family .  I was exploring her blog for Easter ideas that make Jesus the focus of Easter.   She gives 10 great ideas for focusing on Jesus, and one of the ideas she suggested was to plant an Easter garden. . . also called a Resurrection Garden.  Isn't that a beautiful idea?! And I can incorporate planting the Easter grass into this idea!  I was so thrilled when I saw this . . . . and the best part . . . I have all the stuff already to make the gardens!  Yea!  My boys are going to love this and I'm going to love sharing the real story of Easter to my boys in this unique and special way.  You can read about how to make a Resurrection Garden here.

Because my boys enjoyed the Valentine Countdown I did so much, I was looking for ideas for an Easter countdown to do with them.  The Resurrection Eggs are the perfect way to countdown to Easter while teaching my boys all the importants details of the Easter story.

 I know that I can buy the Resurrection Eggs at Walmart or at Family Life, but I have found several links with instructions for making the eggs myself.   

I found on the MOPS (Mothers of Preschoolers) website instructions for doing the Resurrection Eggs with 6 plastic eggs filled with various items to tell the story.  I liked the way they tell the story simply for small children and may use that when I'm telling the story to Shane.

Most Resurrection Eggs sets contain 12 eggs.  I think that is what I'm going to try to put together for my boys.  I also want to make each boy their own set of these special teaching eggs.  My sweet boys haven't mastered the art of sharing as well as I would like. :/

Photo from WeAreThatFamily blog
Here are some links I found for making your own Resurrection Eggs:

1. At WeAreThatFamily blog, she gives several suggestions for items to put in each of the eggs that you can find around your house as well as the items' significance in the Easter story.

2. I also watched a video on the Ministry To Children website which gives great  directions for making the eggs along with a printout for some of the items that are hard to find . . . like the donkey or the sword.

3. On the Happy Home Fairy website, she gives lots of alternatives for the resurrection eggs for different-aged children.  Here is a link she gives for making the eggs at TeachKidsTheBible website which has all the Bible verses along with an example of the different items to put in each egg.

I am probably going to use some of all the ideas from each of these websites in making our family's teaching eggs.

I also think that I'm going to have the children find some of the eggs every night leading up to Easter.  I think that will make the whole Easter week and these activities have a greater meaning for the boys.  It would have been ideal for me to have started this process earlier than now, because Easter is only 9 days away . . . that is, if I were to start tomorrow!  So we will have to do more than 1 egg some of the nights.  But I love the way the resurrection eggs incorporate the "egg hunt" activity with the story of Jesus' journey to the Cross and the Empty Tomb on Easter morning.  I also love the objects used in the lessons that go along with the Bible verses in telling the story. 

Why am I just now doing this with my boys?!?

I thought about getting the boys to help me put together the resurrection eggs, but I also like the idea of them being surprised with the contents of each egg.  I haven't decided what I'm going to do . . .

The weekend of Easter we are going to dye eggs and have a family egg hunt.  Those activities are just a part of the Easter holiday for me, and I can't imagine not doing them with my boys this Easter.  But I do have something new to do on the night before Easter morning . . . Resurrection Cookies!

photo from MOPS website
 I found these cookies on pinterest which led me to the recipe on the MOPS website.
I just love it!  I love the way the children participate in making the cookies and how the recipe corresponds with the Easter story all the way to "sealing the tomb" by sealing the oven to the "empty tomb" represented by the hollowed out cookie!  Love it!
And I think my boys are going to love it too!  I truly believe making these cookies will help to bring the Easter story alive for my boys.  When they are beating and breaking up the nuts for the cookies, I truly believe the Roman soldiers beating Jesus will have more meaning to them.  And when my boys smell and taste the vinegar, the story of the how they gave vinegar to Jesus for his thirst will have more significance.

The Resurrection Garden, the Resurrection Eggs, and the Resurrection Cookies are 3 new ways I'm trying to focus more on Jesus this Easter than on the Easter bunny.  

I am sooooo excited about Easter!  I plan to post our activities here throughout the weekend and coming Holy Week!  I hope I have given you some ideas for your own Easter activities as well.  And these are not the only ideas I have for Easter!  I have lots more I want to do . . . like the resurrection rolls which are different from the resurrection cookies . . .  but I don't want to be so busy doing stuff that I miss out on doing stuff with my boys!   Does that make sense?

So here's wishing you a wonderful weekend of Easter fun from

                         the Ferrell boys and me!


Wednesday, March 28, 2012

The Pinterest-Influenced Birthday Party


I'm somewhat addicted to http://www.pinterest.com/  . . . I say somewhat because I can go days without checking it . . . so I don't think it's truly an addiction . . . but I would definitely say I love it . . . and that I am on the verge of having a problem . . . :D

Take for example . . . Shane's birthday party.

I went on pinterest and did a search for "cowboy birthday party" . . . I followed the leads from that search and "pinned" several ideas on my "cowboy party" board.

So what ideas did I get off pinterest that I actually used for Shane's party . . .

Here we go:

1.  Martha Stewart Cupcake Stand:


I thought this looked so cute and I love Martha!  so I decided to make one. . . or two.  Here's my cupcake stand I made for Shane's party:


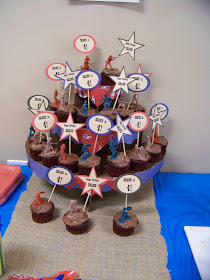
I actually made two cupcake stands and used scrapbook paper to decorate them for our western theme.  I had all the materials already so these cupcakes stands didn't cost me anything to make!  Of course, because I had made the cupcake stand, I had to make cupcakes in addition to the birthday cake! 

I thought the finished cupcake stand with the cupcakes on it turned out really cute!


We put brownies on the other cupcake stand in bandana print cupcake liners I got from Oriental Trading.


2.  Cowboy Cupcake Toppers:


I thought the cupcake toppers were so cute at this party I found on Hostess With the Mostess blog, but I didn't want to pay someone for the toppers when I could make some myself!  So I used my Microsoft Publisher program and made some simple oval and star shape toppers for the cupcakes. 


I thought they turned out pretty cute for an amateur!  And the toy cowboys and indians added a little extra touch to the cupcakes too!

3.  The Cowboy Vest:

I had already made the cowboy vests for Shane's party when I came across this tutorial at Dana Made It for making cowboy vests on pinterest:


So even though the cowboy vests were an original idea of mine . . . seeing these cute little vests helped me decide to cut fringe on the bottom of each vest.  Brown vests for the boys . . .


Pink vests for the girls . . .


I could have embellished the vests more like the one at Dana Made It, but I made 30 vests!  I didn't think embellishments were that important!  Each vest cost a little over $1 to make!  Pretty reasonable price, I think!

4.  Table Centerpieces:

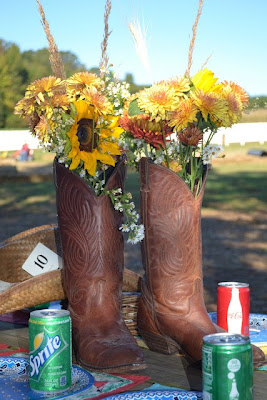
I saw this cute centerpiece on pinterest and followed it to the website, Three Pixie Lane, where I found lots of cute ideas for decorating.


I took some of the boys' cowboy boots that they had outgrown along with some artificial sunflowers, forsythia, feathers, and bandanas I had . . . and I put together some cute centerpieces for the children's tables that cost me nothing!


5.  Wanted Poster Place-setting:

I saw this cute children's table placesetting on pinterest and followed the link to MiniMocha blog where I found lots of cute ideas for decorating . . .


And she used these cute Wanted Posters on the tables for coloring that she got from the Bookmaking With Kids website, and I thought they would make a fun extra activity for the children.


So I printed out copies of the blank Wanted Poster on cardstock paper from Bookmaking With Kids website and used them as place settings on the children's tables too.  I added crayons in little tin pans on the table and laid bandanas out on the plastic tablecloth for additional decor and . . .


Voila!  Instantly the children's tables were very festive and western-looking!


Lots of the children drew and colored on the Wanted Posters so it wasn't a wasted effort even beyond the decorative effect they had on the tables!

6. Cowboy Table Idea:

Someone pinned this cute idea from My Growing Home of using hay bales and a sheet of plywood for the children's table:


I found a red wooden children's table on the side of the road by a school a couple of years ago, and Dave threw it in the back of his truck . . . 

Afterall, I'm always needing a children's table for parties and crafts!  My sweet friend, Robin, also let me borrow a small table from her shop so I would have 2 tables for the children.  Dave was going to make some benches to go with the tables for Shane's party, but he didn't get around to it . . . so I remembered that hay bale table and thought . . . why not use hay bales to sit on ?!? 


I thought the hay added a nice authentic western touch to my whole decorating scheme!

7.  Cardboard Western Town:

By far the cutest thing I saw on pinterest for the cowboy party was the western town made out of large cardboard boxes.  I first saw this cardboard town at the Design Dazzle website, but originally the idea and picture came from Meredith Eisele's blog.


I got a couple of washing machine boxes and a large furniture box from the stores in our little town.  Using the picture above as a model, Dave cut the boxes out and I painted them. . . .


I thought it turned out pretty cute and cost us nothing to make! 


All the children enjoyed playing in the houses and getting their pictures made in it.


Even Zach and Alex enjoyed having their pictures made:


8.  Soup Can Utensil Holder:

I saw this cute idea for using soup cans to hold the plastic forks and spoons at a party on Pinterest and followed the link to a wall photo on a facebook page (http://www.facebook.com/Pizzazzerie?sk=photos):


I started saving empty soup cans and used scrapbook paper to cover the outside of the cans. 


They made very cute dispensers for the plastic forks, spoons, and knives on the food tables . . . and cost me nothing to make!

9.  Wanted Poster Invitations:

I worked on Shane's party invitations for several days before finally settling on the Wanted Poster design for them.  I saw these super cute cd invitations at http://www.kellehampton.com/ and modified it for Shane's party.


We went on a family vacation to Gatlinburg last summer and while we were there, we had a family picture made in one of the old timey photo shops.


I used a cropped out picture of Shane and my Microsoft Publisher program to make his Wanted Poster invitations. 


I think they turned out very cute and they helped to establish our western theme early on with all our party guests!


10.  Family Wanted Poster Decorations:

I found the cute Wanted Poster invitations at http://www.kellehampton.com/ , and while checking out all the cute activities and decorations she used at her party, I saw where she had made Wanted Posters of all the children and used them as decorations at the party.  


I thought it was a really cute idea so . . .


and . . .


I hung these "Wanted" posters above the dessert table.  They really contributed to the overall effect . . . Ha!

11.  Roping Sawhorse :

The one pinterest idea that I didn't complete was the roping sawhorse. 


I saw this cute sawhorse at http://www.mygrowinghome.com/ and thought . . . Hey!  we've got some sawhorses!

Dave and the boys got to work on them and created these lovely "horses."


You have to admit . . . Dave did a great job imitating the picture I gave him.  I was supposed to finish the horses by adding the mane and tail and bandana.  I didn't get to it! 

But it was okay because Robin brought a rope and pretend cow for the children to rope instead of my sad, sad sawhorses. :D


And finally . . .

12.  The Pedestal Cake Stand:

Okay this was not my idea . . . nor my pinterest craft . . . it was a gift from sweet Charlotte, and I know she got the inspiration from pinterest!  I looked on pinterest to find something to show you and this is what I found that came close to giving a tutorial on how to make one:


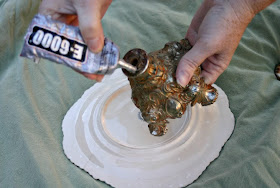
The instructions can be found at http://meandjilly.blogspot.com/ .  You basically get a good sturdy candle stick holder and a plate . . .


and glue them together . . .  Here's my pedestal cake stand made by sweet Charlotte!


And here's my cake stand being used for the first time at Shane's cowboy party!


Really . . . how many cakes should one little boy have?  Ha!

I know this has been an extremely long post about stuff you may care nothing about . . . but somewhere out there could be one person who finds this information very informative and inspiring! 

Pinterest is a great place to find ideas!  The main thing to remember though . . . is you've got to do more than "pin" the ideas to a board to get the real benefit out of Pinterest!  Do it!  But maybe do it . . . in moderation!  Ha!

So happy trails to you . . . and to all happy "pinning" from

                      the Ferrell boys and me!